Chapter 8B. Signs¶
§8B.01 Purpose and Application¶
Support
01. Passive traffic control systems, consisting of signs and pavement markings only, identify and direct attention to the location of a grade crossing and advise road users to reduce their speed or stop at the grade crossing as necessary in order to yield to any rail traffic occupying, or approaching and in proximity to, the grade crossing.
02. Signs and markings regulate, warn, and guide the road users so that they, as well as LRT vehicle operators on mixed-use alignments, can take appropriate action when approaching a grade crossing.
03. Unless otherwise provided in this Chapter, the provisions of Part 2 are applicable to the design and location of signs at grade crossings.
§8B.02 Sizes of Grade Crossing Signs¶
Standard
01. The minimum sizes of grade crossing signs shall be as shown in Table 8B-1.
Option
02. Signs larger than those shown in Table 8B-1 may be used (see Section 2A.07).
§8B.03 Grade Crossing (Crossbuck) Sign (R15-1) and Number of Tracks Plaque (R15-2P) at Active and Passive Grade Crossings¶
Standard
01. The Grade Crossing (R15-1) sign (see Figure 8B-1), commonly identified as the Crossbuck sign, shall be retroreflective white with the words RAILROAD CROSSING in black lettering, mounted as shown in Figure 8B-2.
Support
02. In most States, the Crossbuck sign requires road users to yield the right-of-way to rail traffic at a grade crossing.
Standard
03. As a minimum, one Crossbuck sign shall be used on each highway approach to every highway-rail grade crossing, alone or in combination with other traffic control devices.
04. As a minimum, one Crossbuck sign shall be used on each highway approach to every highway-LRT grade crossing where flashing-light signals or automatic gates are used, alone or in combination with other traffic control devices.
Option
05. A Crossbuck sign may be used on a highway approach to a highway-LRT grade crossing where flashing-light signals or automatic gates are not used, alone or in combination with other traffic control devices.
Standard
06. If there are two or more tracks at a grade crossing, the number of tracks shall be indicated on a supplemental Number of Tracks (R15-2P) plaque (see Figure 8B-1) of inverted T shape mounted below the Crossbuck sign in the manner shown in Figure 8B-2.
07. On each approach to a highway-rail grade crossing and, if used, on each approach to a highway-LRT grade crossing, the Crossbuck sign shall be installed on the right-hand side of the highway on each approach to the grade crossing. Where restricted sight distance or unfavorable highway geometry exists on an approach to a grade crossing, or where there is a one-way multi-lane approach, an additional Crossbuck sign shall be installed on the left-hand side of the highway, possibly placed back-to-back with the Crossbuck sign for the opposite approach, or otherwise located so that two Crossbuck signs are displayed for that approach.
08. A strip of retroreflective white material not less than 2 inches in width shall be used on the back of each blade of each Crossbuck sign for the length of each blade at all passive grade crossings, except those where Crossbuck signs have been installed back-to-back or where double-faced Crossbuck signs have been installed.
Option
09. A strip of retroreflective white material not less than 2 inches in width may be used on the back of each blade of each Crossbuck sign for the length of each blade at active grade crossings.
Table 8B-1. Grade Crossing Sign and Plaque Minimum Sizes (Sheet 1 of 2)
| Sign or Plaque | Sign Designation | Section | Conventional Road | Expressway | Freeway | ||
|---|---|---|---|---|---|---|---|
| Single Lane | Multi-Lane | Minimum | Oversized | ||||
| Stop | R1-1 | 8B.04, 8B.05 | 30 x 30 | 36 x 36 | 36 x 36 | — | 48 x 48 |
| Yield | R1-2 | 8B.04, 8B.05 | 30 x 30 x 30 | 36 x 36 x 36 | 36 x 36 x 36 | — | 48 x 48 x 48 |
| No Right Turn - Train (symbol) | R3-1a | 8D.10 | 24 x 30 | 30 x 36 | — | — | — |
| No Left Turn - Train (symbol) | R3-2a | 8D.10 | 24 x 30 | 30 x 36 | — | — | — |
| Do Not Stop on Tracks | R8-8 | 8B.07 | 24 x 30 | 24 x 30 | 36 x 48 | — | 36 x 48 |
| Tracks Out of Service | R8-9 | 8B.08 | 24 x 24 | 24 x 24 | 36 x 36 | — | 36 x 36 |
| Stop Here When Flashing | R8-10 | 8B.09 | 24 x 36 | 24 x 36 | — | — | 36 x 48 |
| Stop Here When Flashing | R8-10a | 8B.09 | 24 x 30 | 24 x 30 | — | — | 36 x 42 |
| Stop Here on Red | R10-6 | 8B.10 | 24 x 36 | 24 x 36 | — | — | 36 x 48 |
| Stop Here on Red | R10-6a | 8B.10 | 24 x 30 | 24 x 30 | — | — | 36 x 42 |
| Left (Right) Lane Signal | R10-10b | 8D.11 | 24 x 30 | 30 x 36 | — | 24 x 30 | — |
| Left (Right) Turn Lane Signal | R10-10c | 8D.11 | 24 x 30 | 30 x 36 | — | 24 x 30 | — |
| Grade Crossing (Crossbuck) | R15-1 | 8B.03 | 48 x 9 | 48 x 9 | — | — | — |
| Number of Tracks (plaque) | R15-2P | 8B.03 | 27 x 18 | 27 x 18 | — | — | — |
| Exempt (plaque) | R15-3P | 8B.11 | 24 x 12 | 24 x 12 | — | — | — |
| Light Rail Only Right Lane | R15-4a | 8B.12 | 24 x 30 | 24 x 30 | — | — | — |
| Light Rail Only Left Lane | R15-4b | 8B.12 | 24 x 30 | 24 x 30 | — | — | — |
| Light Rail Only Center Lane | R15-4c | 8B.12 | 24 x 30 | 24 x 30 | — | — | — |
| Light Rail Do Not Pass (symbol) | R15-5 | 8B.13 | 24 x 30 | 24 x 30 | — | — | — |
| Do Not Pass Stopped Train | R15-5a | 8B.13 | 24 x 30 | 24 x 30 | — | — | — |
| No Motor Vehicles On Tracks (symbol) | R15-6 | 8B.14 | 24 x 24 | 24 x 24 | — | — | — |
| Do Not Drive On Tracks | R15-6a | 8B.14 | 24 x 30 | 24 x 30 | — | — | — |
| Light Rail Divided Highway (symbol) | R15-7 | 8B.15 | 24 x 24 | 24 x 24 | — | — | — |
| Light Rail Divided Highway (T-Intersection) (symbol) | R15-7a | 8B.15 | 24 x 24 | 24 x 24 | — | — | — |
| Look | R15-8 | 8E.03 | — | — | — | 18 x 9 | — |
| Grade Crossing Advance Warning | W10-1 | 8B.06 | 36 Dia. | 36 Dia. | 48 Dia. | — | 48 Dia. |
| Exempt (plaque) | W10-1aP | 8B.11 | 24 x 12 | 24 x 12 | — | — | — |
| Grade Crossing and Intersection Advance Warning (symbol) | W10-2,3,4 | 8B.06 | 36 x 36 | 36 x 36 | 48 x 48 | — | 48 x 48 |
| Low Ground Clearance (symbol) | W10-5 | 8B.16 | 36 x 36 | 36 x 36 | 48 x 48 | — | 48 x 48 |
| Low Ground Clearance (plaque) | W10-5P | 8B.16 | 30 x 24 | 30 x 24 | — | — | — |
| Light Rail Activated Blank-Out (symbol) | W10-7 | 8B.17 | 24 x 24 | 24 x 24 | — | — | — |
| Trains May Exceed 80 MPH | W10-8 | 8B.19 | 36 x 36 | 36 x 36 | 48 x 48 | — | 48 x 48 |
| No Train Horn | W10-9 | 8B.20 | 36 x 36 | 36 x 36 | 48 x 48 | — | 48 x 48 |
| No Train Horn (plaque) | W10-9P | 8B.20 | 30 x 24 | 30 x 24 | — | — | — |
| Storage Space (symbol) | W10-11 | 8B.21 | 36 x 36 | 36 x 36 | 48 x 48 | — | 48 x 48 |
| Storage Space XX Feet between Tracks & Highway | W10-11a | 8B.21 | 30 x 36 | 30 x 36 | — | — | — |
| Storage Space XX Feet between Highway & Tracks Behind You | W10-11b | 8B.21 | 30 x 36 | 30 x 36 | — | — | — |
| Skewed Crossing (symbol) | W10-12 | 8B.22 | 36 x 36 | 36 x 36 | 48 x 48 | — | 48 x 48 |
| No Gates or Lights (plaque) | W10-13P | 8B.23 | 30 x 24 | 30 x 24 | — | — | — |
| Next Crossing (plaque) | W10-14P | 8B.24 | 30 x 24 | 30 x 24 | — | — | — |
| Use Next Crossing (plaque) | W10-14aP | 8B.24 | 30 x 24 | 30 x 24 | — | — | — |
between Tracks & Highway Highway & Tracks Behind You
Table 8B-1. Grade Crossing Sign and Plaque Minimum Sizes (Sheet 2 of 2)
| Sign or Plaque | Sign Designation | Section | Conventional Road | Expressway | Freeway | ||
|---|---|---|---|---|---|---|---|
| Single Lane | Multi-Lane | Minimum | Oversized | ||||
| Rough Crossing (plaque) | W10-15P | 8B.25 | 30 x 24 | 30 x 24 | — | — | 36 x 30 |
| Another Train Coming Activated Blank-Out | W10-16 | 8B.18 | 30 x 30 | 30 x 30 | — | — | — |
| Busway Crossing | W10-21 | 8B.06 | 36x36 | 36x36 | 48x48 | — | 48x48 |
| Signal Ahead (plaque) | W10-21aP | 8B.06 | 30x24 | 30x24 | — | — | — |
| Emergency Notification | I13-1 | 8B.27 | — | — | — | 12 x 9 | — |
| Push to Exit | I13-2 | 8E.06 | — | — | — | 18 x 9 | — |
Notes: 1. Larger signs may be used when appropriate 2. Dimensions in inches are shown as width x height 3. Table 9A-1 shows the minimum sizes that may be used for grade crossing signs and plaques that face shared-use paths and pedestrian facilities
Notes: 1. Larger signs may be used when appropriate
- 2. Dimensions in inches are shown as width x height
- 3. Table 9A-1 shows the minimum sizes that may be used for grade crossing signs and plaques that face shared-use paths and pedestrian facilities
Guidance
10. Minimum clearance dimensions for crossbuck signs relative to the proximity to the nearest rail should conform to the requirements of the railroad company and/or transit agency, and the regulatory agency with statutory authority (if applicable).
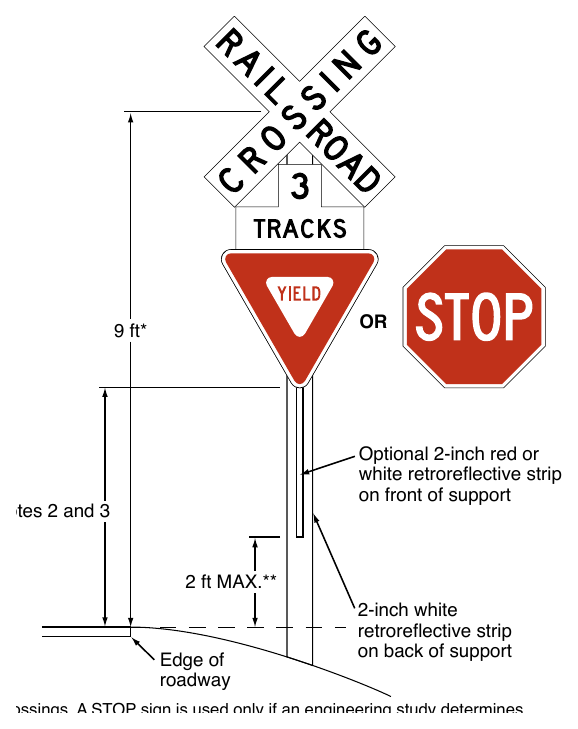
11. Except as provided in Paragraph 12 of this Section, the mounting height of Crossbuck signs, measured vertically from the center of the sign to the elevation of the near edge of the pavement, should be approximately 9 feet (see Figure 8B-2).
Option
12. The 9-foot mounting height for the Crossbuck sign may be varied as required by local conditions and may be increased to accommodate signs mounted below the Crossbuck sign.
§8B.04 Crossbuck Assemblies with YIELD or STOP Signs at Passive Grade Crossings¶
Standard
01. A Crossbuck Assembly shall consist of a Crossbuck (R15-1) sign, and a Number of Tracks (R15-2P) plaque if two or more tracks are present, that complies with the provisions of Section 8B.03, and either a YIELD (R1-2) or STOP (R1-1) sign installed on the same support, except as provided in Paragraph 10 of this Section. YIELD or STOP signs used at passive grade crossings shall be installed in compliance with the provisions of Section 2B.18, and Figures 8B-2 and 8B-3.
02. At all public highway-rail grade crossings that are not equipped with the active traffic control systems that are described in Chapter 8D, except crossings where road users are directed by an authorized person on the ground to not enter the crossing at all times that an approaching train is about to occupy the crossing, a Crossbuck Assembly shall be installed on the right-hand side of the highway on each approach to the highway-rail grade crossing.
03. If a Crossbuck sign is used on a highway approach to a public highway-LRT grade crossing that is not equipped with the active traffic control systems that are described in Chapter 8D, a Crossbuck Assembly shall be installed on the right-hand side of the highway on each approach to the highway-LRT grade crossing.
04. Where restricted sight distance or unfavorable highway geometry exists on an approach to a grade crossing that has a Crossbuck Assembly, or where there is a one-way multi-lane approach, an additional Crossbuck Assembly shall be installed on the left-hand side of the highway.
05. A YIELD sign shall be the default traffic control device for Crossbuck Assemblies on all highway approaches to passive grade crossings unless an engineering study performed by the regulatory agency or highway authority having jurisdiction over the roadway approach determines that a STOP sign is appropriate.
Guidance
06. The use of STOP signs at passive grade crossings should be limited to unusual conditions where requiring all motor vehicles to make a full stop is determined to be necessary by a Diagnostic Team. Among the factors that should be considered by the Diagnostic Team are the line of sight to approaching rail traffic (giving due consideration to seasonal crops or vegetation beyond both the highway and railroad or LRT rights-of-ways), the number of tracks, the speeds of trains or LRT equipment and motor vehicles, and the crash history at the grade crossing.
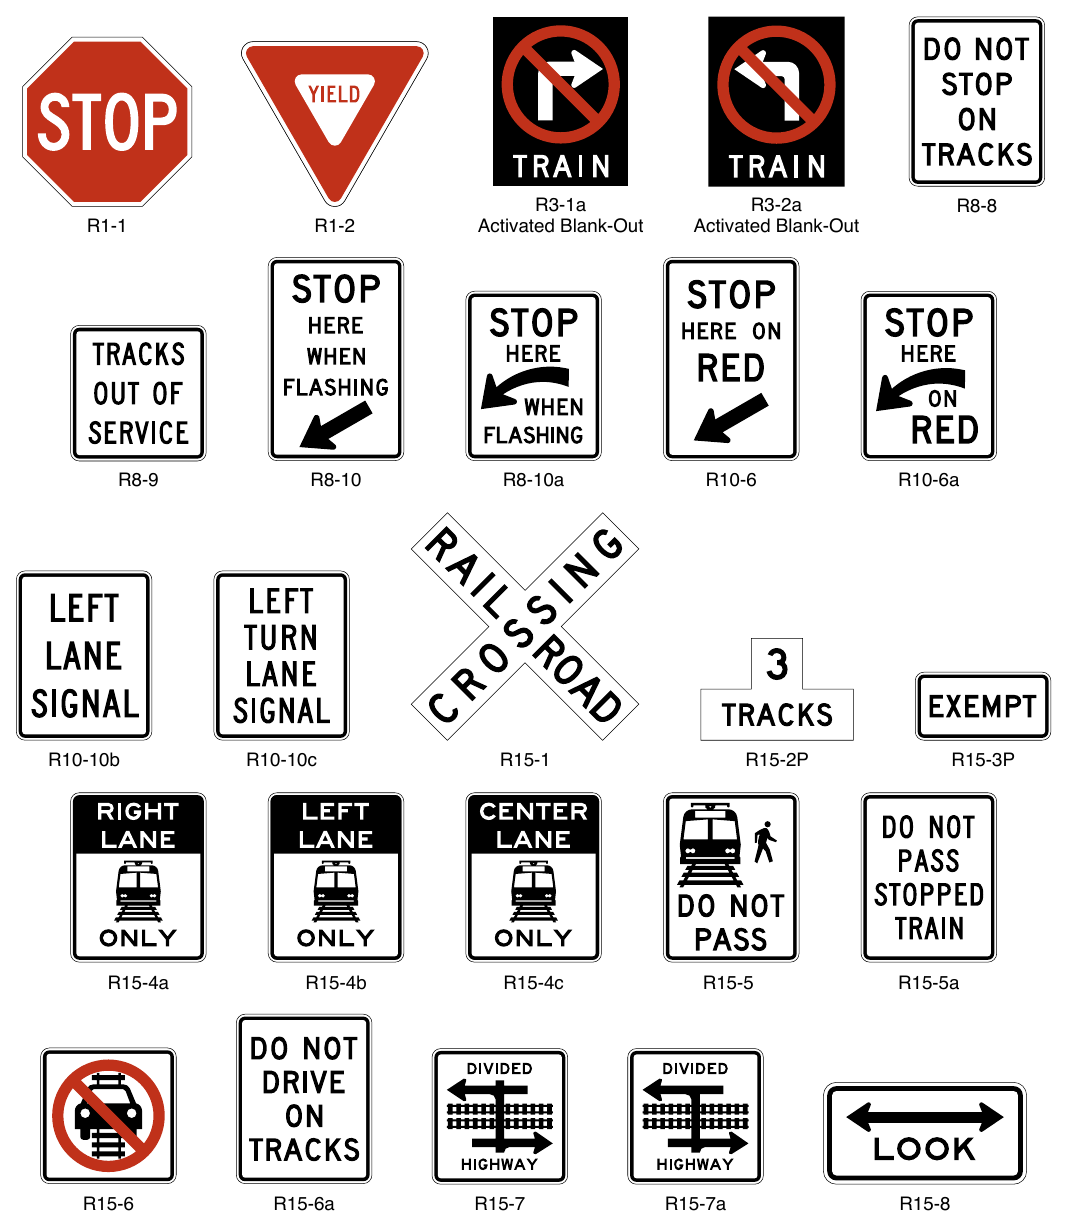
Signs shown: R3-1a, R3-2a, R8-8, R1-1, R1-2, R8-9, R8-10, R8-10a, R10-6, R10-6a, R10-10b, R10-10c, R15-1, R15-2P, R15-3P, R15-4a, R15-4b, R15-4c, R15-5, R15-5a, R15-6, R15-6a, R15-7, R15-7a, R15-8
local conditions and may be increased to accommodate signs mounted below the Crossbuck sign Notes:
- 1. YIELD or STOP signs are used only at passive crossings. A STOP sign is used only if an engineering study determines that it is appropriate for that particular approach.
- 2. Mounting height shall be at least 4 feet for installations of YIELD or STOP signs on existing Crossbuck sign supports.
- 3. Mounting height shall be at least 5 feet for new installations in rural areas and at least 7 feet for new installations in areas where parking or pedestrian movements are likely to occur.
07. Where a passive grade crossing is located on a stop-controlled approach and the clear storage distance is less than the length of the design vehicle, and where adequate sight distance to oncoming traffic on the parallel roadway is available to road users stopped on the approach to the grade crossing, consideration should be given to installing a STOP sign at the Crossbuck Assembly instead of at the highway-highway intersection. If the STOP sign is installed at the Crossbuck Assembly instead of at the highway-highway intersection, the Diagnostic Team should consider installing some other intersection traffic control device at the highway-highway intersection.
Standard
08. If a Crossbuck Assembly is installed on the approach to a passive grade crossing located at a highway-highway intersection controlled by a traffic control signal that is not interconnected with the grade crossing and not preempted by the approach of rail traffic, a Diagnostic Team shall be convened to determine the appropriate traffic control devices. A STOP sign shall not be installed on a Crossbuck Assembly in this situation.
Support
09. Sections 8A.01 through 8A.05 contain information regarding the responsibilities of the Diagnostic Team, highway agency, regulatory agency with statutory authority (if applicable), and the railroad company or transit agency regarding the selection, design, and operation of traffic control devices placed at grade crossings.
Option
10. If a YIELD or STOP sign is installed for a Crossbuck Assembly at a grade crossing, it may be installed on the same support as the Crossbuck sign or it may be installed on a separate support at a point where the motor vehicle is to stop, or as near to that point as practicable, but in either case, the YIELD or STOP sign is considered to be a part of the Crossbuck Assembly.
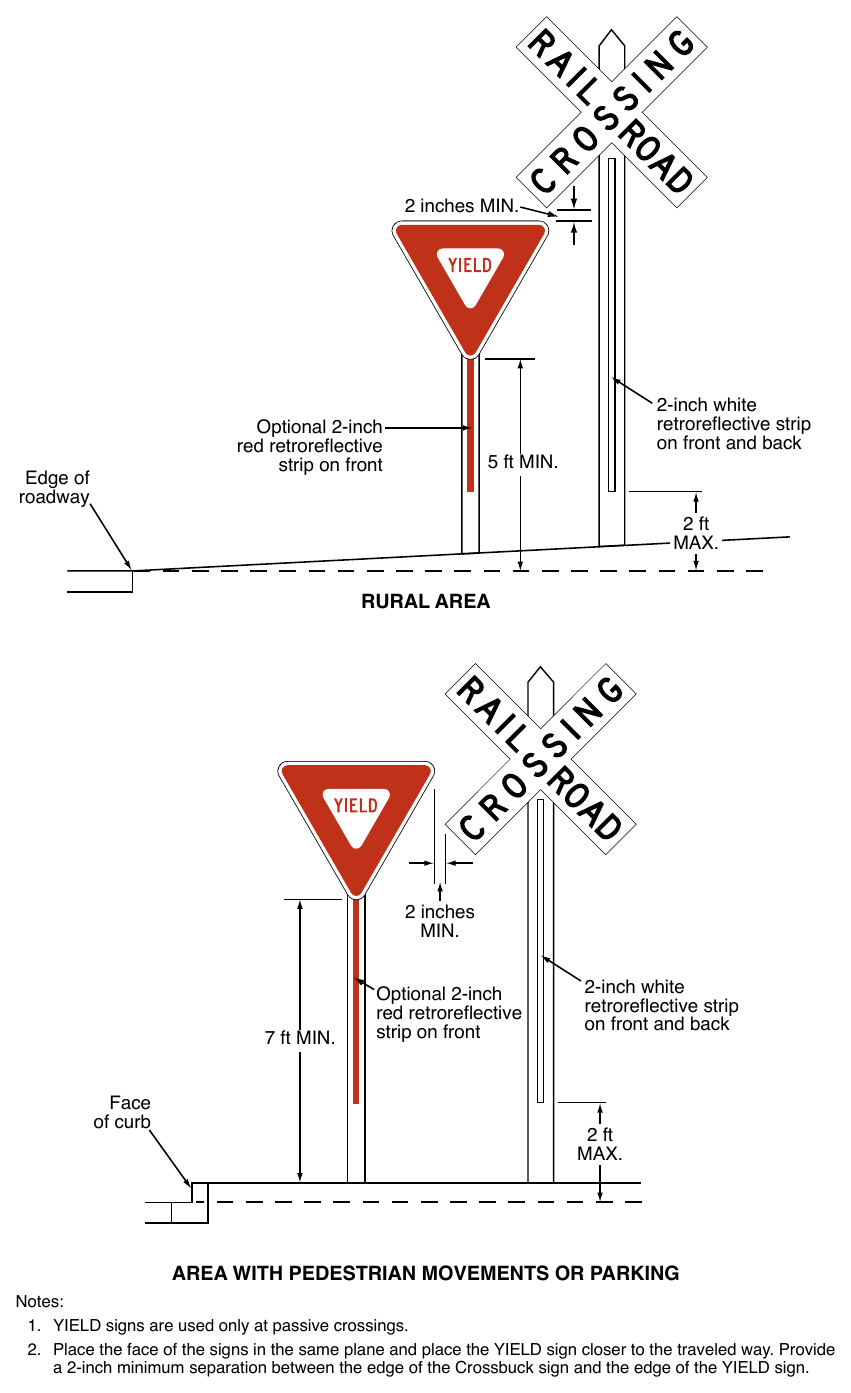
on a Separate Sign Support (Sheet 1 of 2) 2 inches MIN. Optional 2-inch red retroreflective strip on front Edge of roadway 2-inch white retroreflective strip on front and back 5 ft MIN. 2 ft 2 inches 7 ft MIN. Face of curb Optional 2-inch red retroreflective strip on front 2-inch white retroreflective strip on front and back 2 ft AREA WITH PEDESTRIAN MOVEMENTS OR PARKING Notes:
- 1. YIELD signs are used only at passive crossings.
- 2. Place the face of the signs in the same plane and place the YIELD sign closer to the traveled way. Provide a 2-inch minimum separation between the edge of the Crossbuck sign and the edge of the YIELD sign.
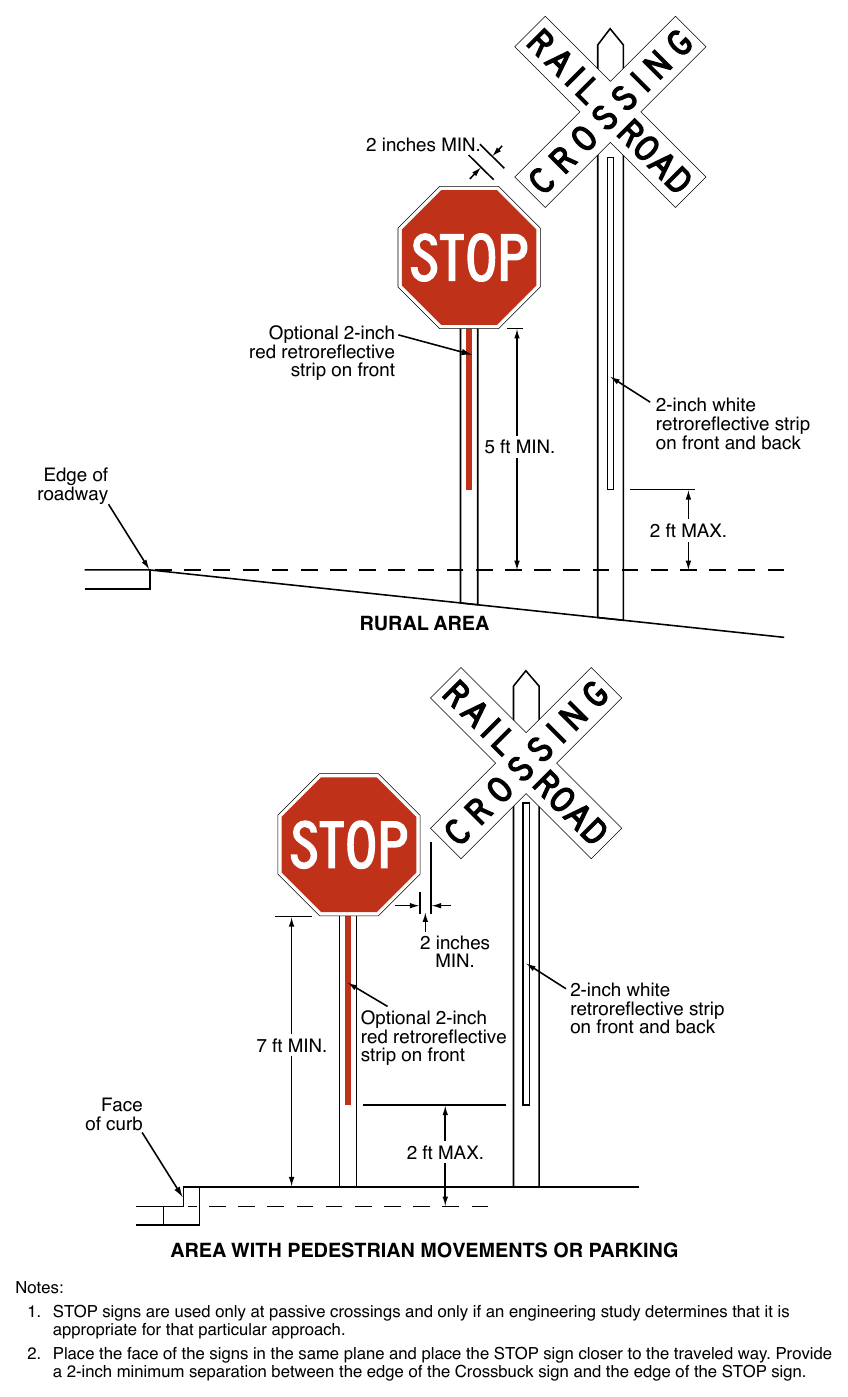
on a Separate Sign Support (Sheet 2 of 2) 2 inches MIN. Optional 2-inch red retroreflective strip on front 5 ft MIN. Edge of roadway 2-inch white retroreflective strip on front and back 2 ft MAX. 2 inches 7 ft MIN. Face of curb Optional 2-inch red retroreflective strip on front 2-inch white retroreflective strip on front and back 2 ft MAX. AREA WITH PEDESTRIAN MOVEMENTS OR PARKING Notes:
- 1. STOP signs are used only at passive crossings and only if an engineering study determines that it is appropriate for that particular approach.
- 2. Place the face of the signs in the same plane and place the STOP sign closer to the traveled way. Provide a 2-inch minimum separation between the edge of the Crossbuck sign and the edge of the STOP sign.
Standard
If a YIELD or STOP sign is installed on an existing Crossbuck sign support, the mounting height, measured vertically from the bottom of the YIELD or STOP sign to the top of the curb, or in the absence of curb, measured vertically from the bottom of the YIELD or STOP sign to the elevation of the near edge of the traveled way, shall be at least 4 feet (see Figure 8B-2).
12. If a Crossbuck Assembly is installed on a new sign support (see Figure 8B-2) or if the YIELD or STOP sign is installed on a separate support (see Figure 8B-3), the mounting height, measured vertically from the bottom of the YIELD or STOP sign to the top of the curb, or in the absence of curb, measured vertically from the bottom of the YIELD or STOP sign to the elevation of the near edge of the traveled way, shall be at least 5 feet in rural areas and shall be at least 7 feet in areas where parking or pedestrian movements are likely to occur.
Guidance
13. If a YIELD or STOP sign is installed for a Crossbuck Assembly at a grade crossing on a separate support than the Crossbuck sign (see Figure 8B-3), the YIELD or STOP sign should be placed in the same plane as the Crossbuck sign and closer to the traveled way than the Crossbuck sign. The minimum separation between the nearest point of the YIELD or STOP sign and the nearest point of the Crossbuck sign should be 2 inches as shown in Figure 8B-3.
Support
14. The meaning of a Crossbuck Assembly that includes a YIELD sign is that a road user approaching the grade crossing needs to be prepared to decelerate, and when necessary, yield the right-of-way to any rail traffic that might be occupying the crossing or might be approaching and in such close proximity to the crossing that it would be unsafe for the road user to cross.
15. Certain commercial motor vehicles and school buses are required to stop at all grade crossings in accordance with 49 CFR 392.10 even if a YIELD sign (or just a Crossbuck sign) is posted.
16. The meaning of a Crossbuck Assembly that includes a STOP sign is that a road user approaching the grade crossing must come to a full stop not less than 15 feet short of the nearest rail, and remain stopped while the road user determines if there is rail traffic either occupying the crossing or approaching and in such close proximity to the crossing that the road user must yield the right-of-way to rail traffic. The road user is permitted to proceed when it is safe to cross.
Standard
17. A vertical strip of retroreflective white material, not less than 2 inches in width, shall be used on each Crossbuck support at passive grade crossings for the full length of the back of the support from the Crossbuck sign or Number of Tracks plaque to within 2 feet above the near edge of the roadway, except as provided in Paragraph 18 of this Section. A white retroreflective strip wrapped around a round support for the full length of the support from the Crossbuck Sign or Number of Tracks plaque to within 2 feet above the near edge of the roadway shall satisfy this requirement as long as the round support has an outside diameter of at least 2 inches.
Option
18. The vertical strip of retroreflective material may be omitted from the back sides of Crossbuck sign supports installed on one-way streets and at pathway or sidewalk grade crossings (see Section 8E.05).
19. If a YIELD or STOP sign is installed on the same support as the Crossbuck sign, a vertical strip of red (see Section 2A.11) or white retroreflective material that is at least 2 inches wide may be used on the front of the support from the YIELD or STOP sign to within 2 feet above the near edge of the roadway.
Standard
20. If a Crossbuck sign support at a passive grade crossing does not include a YIELD or STOP sign (either because the YIELD or STOP sign is placed on a separate support or because a YIELD or STOP sign is not present on the approach), a vertical strip of retroreflective white material, not less than 2 inches in width, shall be used for the full length of the front of the support from the Crossbuck sign or Number of Tracks plaque to within 2 feet above the near edge of the roadway. A white retroreflective strip wrapped around a round support for the full length of the support from the Crossbuck Sign or Number of Tracks plaque to within 2 feet above the near edge of the roadway shall satisfy this requirement as long as the round support has an outside diameter of at least 2 inches.
21. At all grade crossings where YIELD or STOP signs are installed, Yield Ahead (W3-2) or Stop Ahead (W3-1) signs shall also be installed if the criteria for their installation in Section 2C.35 is met.
Support
22. Section 8C.03 contains provisions regarding the use of stop lines or yield lines at grade crossings.
§8B.05 Use of STOP (R1-1) or YIELD (R1-2) Signs without Crossbuck Signs at Highway-LRT Grade Crossings¶
Guidance
01. The use of only STOP or YIELD signs for road users at highway-LRT grade crossings should be limited to those crossings where the need and feasibility is determined by the Diagnostic Team. Such crossings should have all of the following characteristics:
- A. The crossing roadways are secondary in character (such as a minor street with one lane in each direction, an alley, or a driveway) with low traffic volumes and low speed limits. The specific thresholds of traffic volumes and speed limits should be determined by the local agencies.
- B. The line of sight for an approaching LRT operator is adequate from a sufficient distance such that the operator can sound an audible signal and bring the LRT equipment to a stop before arriving at the crossing.
- C. The road user has sufficient sight distance at the stop line to permit the vehicle to cross the tracks before the arrival of the LRT equipment.
- D. If at an intersection of two roadways, the intersection does not meet the warrants for a traffic control signal as provided in Chapter 4C.
- E. The LRT tracks are located such that motor vehicles are not likely to stop on the tracks while waiting to enter a crossroad or highway.
Standard
02. For all highway-LRT grade crossings where only STOP (R1-1) or YIELD (R1-2) signs are installed, the placement shall comply with the requirements of Section 2B.18. Stop Ahead (W3-1) or Yield Ahead (W3-2) Advance Warning signs shall also be installed if the criteria for their installation given in Section 2C.35 is met.
§8B.06 Grade Crossing Advance Warning Signs (W10-1 through W10-4)¶
Standard
01. A Grade Crossing Advance Warning (W10-1) sign (see Figure 8B-4) shall be used on each highway in advance of every grade crossing, except in the following circumstances:
- A. On an approach to a grade crossing from an intersection with a parallel highway if the distance from the nearest rail of the tracks to the edge of the parallel roadway is less than 100 feet and W10-2, W10-3, or W10-4 signs are used on the approaches of the parallel highway (see Paragraph 5 of this Section);
- B. On low-volume, low-speed highways crossing minor spurs or other tracks that are infrequently used and road users are directed by an authorized person on the ground to not enter the crossing at all times that approaching rail traffic is about to occupy the crossing;
- C. In business or commercial areas where active grade crossing traffic control systems are in use;
- D. Where physical conditions do not permit even a partially effective display of the sign; or
- E. At highway-LRT grade crossings where Crossbuck signs are not used (see Section 8B.03).
02. The placement of the Grade Crossing Advance Warning sign shall be in accordance with Section 2C.04 and Table 2C-3.
03. If a YIELD or STOP sign is present at a passive grade crossing, a Yield Ahead (W3-2) or Stop Ahead (W3-1) Advance Warning sign shall also be installed if the criteria for their installation given in Section 2C.35 is met. If a Yield Ahead or Stop Ahead sign is installed on the approach to the crossing, the W10-1 sign shall be installed upstream from the Yield Ahead or Stop Ahead sign. The Yield Ahead or Stop Ahead sign shall be located in accordance with Table 2C-3. The minimum distance between the signs shall be in accordance with Section 2C.04 and Table 2C-3.
Option
04. On divided highways and one-way streets, an additional W10-1 sign may be installed on the left-hand side of the roadway.
Standard
05. If the distance between the tracks and a parallel highway, from the nearest rail of the tracks to the edge of the parallel roadway, is less than 100 feet, a W10-2, W10-3, or W10-4 sign (see Figure 8B-4) shall be installed on each approach of the parallel highway to warn road users making a turn that they will encounter a grade crossing soon after making a turn, and a W10-1 sign for the approach to the tracks shall not be required to be between the tracks and the parallel highway.
06. If the W10-2, W10-3, or W10-4 sign is used, sign placement in accordance with the guidelines for Intersection Warning signs in Table 2C-3 using the speed of through traffic shall be measured from the highway intersection.
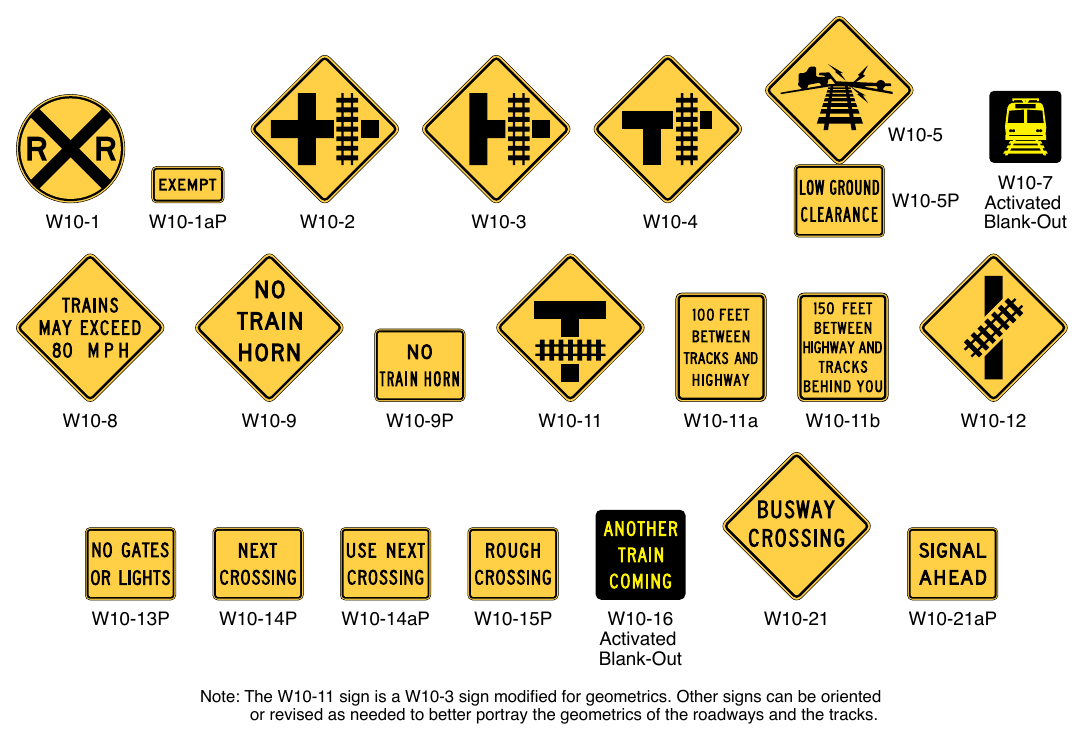
Signs shown: W10-5, W10-7, W10-5P, W10-1, W10-1aP, W10-2, W10-3, W10-4, W10-8, W10-9, W10-9P, W10-11, W10-11a, W10-11b, W10-12, W10-13P, W10-14P, W10-14aP, W10-15P, W10-16, W10-21, W10-21aP
Note: The W10-11 sign is a W10-3 sign modified for geometrics. Other signs can be oriented or revised as needed to better portray the geometrics of the roadways and the tracks.
Guidance
07. If the distance between the tracks and the parallel highway, from the nearest rail of the tracks to the edge of the parallel roadway, is 100 feet or more, a W10-1 sign should be installed in advance of the grade crossing, and the W10-2, W10-3, or W10-4 sign should not be used on the parallel highway.
§8B.07 DO NOT STOP ON TRACKS Sign (R8-8)¶
Guidance
01. If motor vehicle queues are likely to extend onto the tracks, a DO NOT STOP ON TRACKS (R8-8) sign (see Figure 8B-1) should be used.
Support
02. Locations where motor vehicles could queue onto the grade crossing include intersections where a STOP or YIELD sign is installed downstream of the grade crossing, where there is a downstream circular intersection, or where there is a pre-signal installed at the grade crossing.
Guidance
03. The R8-8 sign, if used, should be located on the right-hand side of the highway on either the near or far side of the grade crossing, depending upon which position provides better visibility to approaching drivers.
Option
04. DO NOT STOP ON TRACKS signs may be placed on both sides of the track.
05. On divided highways and one-way streets, a second DO NOT STOP ON TRACKS sign may be placed on the near or far left-hand side of the highway at the grade crossing to further improve the visibility of the sign.
§8B.08 TRACKS OUT OF SERVICE Sign (R8-9)¶
Option
01. The TRACKS OUT OF SERVICE (R8-9) sign (see Figure 8B-1) may be used at a grade crossing instead of a Crossbuck (R15-1) sign and a Number of Tracks (R15-2P) plaque or instead of a Crossbuck Assembly where railroad or LRT tracks have been temporarily or permanently abandoned, but only until such time that the tracks are removed or covered.
Standard
02. Where tracks are out of service, except as provided in Paragraphs 3 and 4 of this Section, traffic control devices and gate arms shall be removed and the signal heads shall be removed or hooded or turned from view to clearly indicate that they are not in operation.
03. Where tracks are out of service, even if a TRACKS OUT OF SERVICE (R8-9) sign has been installed, an Emergency Notification System (I13-1) sign (see Section 8B.27) shall be retained at the grade crossing and shall be visible to road users, except in cases where the emergency phone number is no longer in service.
Guidance
04. Warning signs, such as the Low Ground Clearance Grade Crossing (W10-5) sign and the Skewed Crossing (W10-12) sign, that warn road users about physical roadway conditions at the grade crossing should be left in place after the tracks are taken out of service, until the physical condition is no longer present.
Standard
05. The R8-9 sign shall be removed when the tracks have been removed or paved over or when the grade crossing is returned to service. The Emergency Notification System (I13-1) sign shall be removed when the tracks have been removed or paved over.
§8B.09 STOP HERE WHEN FLASHING Signs (R8-10 and R8-10a)¶
Option
01. The STOP HERE WHEN FLASHING (R8-10 and R8-10a) signs (see Figure 8B-1) may be used at a grade crossing to inform drivers of the location of the stop line or the point at which to stop when the flashing-light signals (see Section 8D.02) are activated.
§8B.10 STOP HERE ON RED Signs (R10-6 and R10-6a)¶
Support
01. The STOP HERE ON RED (R10-6 or R10-6a) sign (see Figure 8B-1) defines and facilitates observance of stop lines at traffic control signals.
Option
02. STOP HERE ON RED signs may be used at locations where motor vehicles frequently violate the stop line or where it is not obvious to road users where to stop.
Guidance
03. If possible, stop lines should be placed at a point where the motor vehicle driver has adequate sight distance along the track.
§8B.11 EXEMPT Grade Crossing Plaques (R15-3P and W10-1aP)¶
Option
01. Where authorized by law or regulation, an EXEMPT (R15-3P) plaque (see Figure 8B-1) with a white background may be used below the Crossbuck sign or Number of Tracks plaque, if present, at the grade crossing, and an EXEMPT (W10-1aP) plaque (see Figure 8B-4) with a yellow background may be used below the Grade Crossing Advance Warning (W10-1 through W10-4) sign.
02. Where neither the Crossbuck sign nor the advance warning signs exist for a particular highway-LRT grade crossing, an EXEMPT (R15-3P) plaque with a white background may be placed on its own post on the near right-hand side of the approach to the crossing.
Support
03. These plaques inform drivers of motor vehicles carrying passengers for hire, school buses carrying students, or motor vehicles carrying hazardous materials that a stop is not required at certain designated grade crossings, except when rail traffic is approaching or occupying the grade crossing, or the driver’s view is blocked.
§8B.12 Light Rail Transit Only Lane Signs (R15-4 Series)¶
Support
01. The Light Rail Transit Only Lane (R15-4 series) signs (see Figure 8B-1) are used for multi-lane operations, where road users might need additional guidance on lane use and/or restrictions.
Option
02. Light Rail Transit Only Lane signs may be used on a roadway lane limited to only LRT use to indicate the restricted use of a lane in semi-exclusive and mixed alignments.
Guidance
03. If used, the R15-4a, R15-4b, and R15-4c signs should be installed on posts adjacent to the roadway containing the LRT tracks or overhead above the LRT only lane.
Option
04. If the trackway is paved, preferential lane markings (see Chapter 3E) may be installed, but only in combination with Light Rail Transit Only Lane signs.
Support
05. The trackway is the continuous way designated for LRT, including the entire dynamic envelope. Section 8C.06 contains more information regarding the dynamic envelope.
§8B.13 Do Not Pass Light Rail Transit Signs (R15-5 and R15-5a)¶
Support
01. A Do Not Pass Light Rail Transit (R15-5) sign (see Figure 8B-1) is used to indicate that motor vehicles are not allowed to pass LRT vehicles that are loading or unloading passengers where there is no raised platform or physical separation from the lanes upon which other motor vehicles are operating.
Option
02. The R15-5 sign may be used in mixed-use alignments and may be mounted overhead where there are multiple lanes.
03. Instead of the R15-5 symbol sign, a regulatory sign with the word message DO NOT PASS STOPPED TRAIN (R15-5a) may be used (see Figure 8B-1).
Guidance
04. If used, the R15-5 or R15-5a sign should be located immediately before the LRT boarding area.
§8B.14 No Motor Vehicles on Tracks Signs (R15-6 and R15-6a)¶
Support
01. The No Motor Vehicles On Tracks (R15-6) sign (see Figure 8B-1) is used where there are adjacent traffic lanes separated from the LRT lane by a curb or pavement markings.
Guidance
02. The DO NOT ENTER (R5-1) sign should be used where a road user could wrongly enter an LRT only street.
Option
03. A No Motor Vehicles On Tracks sign may be used to deter motor vehicles from driving on the trackway. It may be installed on a 3-foot flexible post between double tracks, on a post alongside the tracks, or overhead.
04. Instead of the R15-6 symbol sign, a regulatory sign with the word message DO NOT DRIVE ON TRACKS (R15-6a) may be used (see Figure 8B-1).
05. A reduced size of 12 x 12 inches may be used if the R15-6 sign is installed between double tracks.
Standard
06. The smallest size for the R15-6 sign shall be 12 x 12 inches.
§8B.15 Divided Highway with Light Rail Transit Crossing Signs (R15-7 Series)¶
Option
01. The Divided Highway with Light Rail Transit Crossing (R15-7 or R15-7a) sign (see Figure 8B-1) may be used as a supplemental sign on the approach legs of a roadway that intersects with a divided highway where LRT equipment operates in the median. The sign may be placed beneath a STOP sign or mounted separately.
Guidance
02. The number of tracks displayed on the R15-7 or R15-7a sign should be the same as the actual number of tracks.
Standard
03. When the Divided Highway with Light Rail Transit Crossing sign is used at a four-leg intersection, the R15-7 sign shall be used. When used at a T-intersection, the R15-7a sign shall be used.
§8B.16 Low Ground Clearance Grade Crossing Sign (W10-5)¶
Guidance
01. If the highway profile conditions are sufficiently abrupt to create a hang-up situation for long wheelbase vehicles or for trailers with low ground clearance, the Low Ground Clearance Grade Crossing (W10-5) sign (see Figure 8B-4) should be installed in advance of the grade crossing.
Standard
02. Because this symbol might not be readily recognizable by the public, the Low Ground Clearance Grade Crossing (W10-5) warning sign shall be accompanied by a LOW GROUND CLEARANCE (W10-5P) educational plaque. The LOW GROUND CLEARANCE educational plaque shall remain in place for at least 3 years after the initial installation of the W10-5 sign (see Section 2A.09).
Guidance
03. Because other vehicle types and combinations also face the potential risk of hanging up at a grade crossing, word message warning signs and selective exclusion regulatory signs (see Section 2B.45) for specific vehicle types and combinations should be used in addition to, or in place of, the Low Ground Clearance Grade Crossing (W10-5) sign.
Support
04. While not all inclusive, some potential low ground clearance vehicles and combinations include single-unit trucks, buses, motor coaches, low-boy trailers, car carriers, and recreational vehicles.
Guidance
05. Auxiliary plaques such as AHEAD, NEXT CROSSING, or USE NEXT CROSSING (with appropriate arrows), or a supplemental distance plaque should be placed below the W10-5 sign at the nearest intersecting highway where a vehicle can detour or at a point on the highway wide enough to permit a U-turn.
06. If engineering judgment of roadway geometric and operating conditions confirms that motor vehicle speeds across the tracks should be below the posted speed limit, a W13-1P advisory speed plaque should be posted.
07. A signed detour should be installed to guide potential hang-up vehicles to alternate nearby crossings to avoid the potential hang-up condition.
Support
08. Information on ground clearance requirements at grade crossings is available in the “Communications and Signals Manual,” 2023 Edition, AREMA, or in “A Policy on Geometric Design of Highways and Streets,” 2018 Edition, AASHTO.
09. An inventory of crossings with low ground clearance concerns, including a list of potential vehicle types that could hang up on the crossing, can be useful in tracking locations of low ground clearance crossings. Specific geometric conditions, known incidents, or anecdotal evidence of vehicle hang-ups can also be used to identify crossings with low ground clearance concerns.
§8B.17 Light Rail Transit Approaching-Activated Blank-Out Warning Sign (W10-7)¶
Support
01. The Light Rail Transit Approaching-Activated Blank-Out (W10-7) warning sign (see Figure 8B-4) supplements the traffic control devices to warn road users crossing the tracks of approaching LRT equipment.
Option
02. A Light Rail Transit Approaching-Activated Blank-Out warning sign may be used at signalized intersections near highway-LRT grade crossings or at crossings controlled by STOP signs or automatic gates.
Support
03. The provisions contained in Chapter 2L for blank-out signs are applicable to the W10-7 sign.
§8B.18 Another Train Coming Sign (W10-16)¶
Support
01. Conflicts between vehicles or vulnerable road users and multiple trains can occur at multi-track crossings on sidewalks, pathways, and at crossings in station areas where grade crossing users might not consider the arrival of another train on a different track.
Guidance
02. The decision to provide notification of another train should be made by a Diagnostic Team. In making this determination, the Diagnostic Team should consider the pedestrian usage, pedestrian collision history, train speeds and volumes, operating plans and/or schedules, and the presence of a nearby station or transit center.
Option
03. An ANOTHER TRAIN COMING (W10-16) train-activated blank-out sign (see Figure 8B-4) may be used to provide notification of another train coming. For added sign conspicuity, a Warning Beacon may be used in accordance with the requirements of Section 4S.03.
§8B.19 TRAINS MAY EXCEED 80 MPH Sign (W10-8)¶
Guidance
01. Where trains are permitted to travel at speeds exceeding 80 mph, a TRAINS MAY EXCEED 80 MPH (W10-8) sign (see Figure 8B-4) should be installed facing road users approaching the highway-rail grade crossing.
02. If used, the TRAINS MAY EXCEED 80 MPH signs should be installed between the Grade Crossing Advance Warning (W10-1 through W10-4) sign (see Figure 8B-4) and the highway-rail grade crossing on all approaches to the highway-rail grade crossing. The locations should be determined based on specific site conditions.
§8B.20 NO TRAIN HORN Sign or Plaque (W10-9 and W10-9P)¶
Standard
Either a NO TRAIN HORN (W10-9) sign (see Figure 8B-4) or a NO TRAIN HORN (W10-9P) plaque (see Figure 8B-4) shall be installed in each direction at each highway-rail grade crossing where a Quiet Zone has been established in compliance with 49 CFR Part 222. If a W10-9P plaque is used, it shall supplement and be mounted directly below the Grade Crossing Advance Warning (W10-1 through W10-4) sign (see Figure 8B-4).
§8B.21 Storage Space Signs (W10-11, W10-11a, and W10-11b)¶
Guidance
01. A Storage Space (W10-11) sign supplemented by a word message Storage Space Ahead (W10-11a) sign (see Figure 8B-4) should be used where there is a highway intersection in close proximity to the grade crossing and the Diagnostic Team determines that adequate space is not available to store a design vehicle(s) between the highway intersection and the train or LRT equipment dynamic envelope.
02. The Storage Space (W10-11 and W10-11a) signs should be mounted in advance of the grade crossing at an appropriate location to advise drivers of the space available for motor vehicle storage between the highway intersection and the grade crossing.
Option
03. A word message Storage Space Behind (W10-11b) sign (see Figure 8B-4) may be mounted beyond the grade crossing at the highway intersection under the STOP or YIELD sign or just prior to the signalized intersection to remind drivers of the storage space between the tracks and the highway intersection.
Standard
04. A Storage Space (W10-11) sign shall not be used as a replacement for the required Advance Warning (W10-1) sign. If used, the Storage Space sign shall be used in addition to the W10-1 sign and shall be mounted on a separate post.
§8B.22 Skewed Crossing Sign (W10-12)¶
Option
01. The Skewed Crossing (W10-12) sign (see Figure 8B-4) may be used at a skewed grade crossing to warn road users that the tracks are not perpendicular to the highway.
Guidance
02. If the Skewed Crossing sign is used, the symbol should show the direction of the crossing (near left to far right as shown on the sign image in Figure 8B-4, or the mirror image if the track goes from far left to near right).
Standard
03. The Skewed Crossing sign shall not be used as a replacement for the required Advance Warning (W10-1) sign. If used, the Skewed Crossing sign shall be used in addition to the W10-1 sign and shall be mounted on a separate post.
§8B.23 NO GATES OR LIGHTS Plaque (W10-13P)¶
Option
The NO GATES OR LIGHTS (W10-13P) plaque (see Figure 8B-4) may be mounted below the Grade Crossing Advance Warning (W10-1 through W10-4) sign at grade crossings that are not equipped with automatic gates or automated signals.
§8B.24 Next Crossing Plaques (W10-14P and W10-14aP)¶
Option
01. The NEXT CROSSING (W10-14P) plaque (see Figure 8B-4) may be mounted below the Low Ground Clearance (W10-5) sign (see Section 8B.16) or Skewed Crossing (W10-12) sign to indicate to a road user that the warning is associated with the next grade crossing. This plaque may be used where multiple grade crossings exist in close proximity to one another.
02. Where recommended by a Diagnostic Team, the USE NEXT CROSSING (W10-14aP) plaque (see Figure 8B-4) may be mounted below the Low Ground Clearance (W10-5) sign (see Section 8B.16) to advise a road user with a low clearance load to use the crossing after the upcoming crossing to avoid encountering a low ground clearance situation.
§8B.25 ROUGH CROSSING Plaque (W10-15P)¶
Option
01. The ROUGH CROSSING (W10-15P) plaque (see Figure 8B-4) may be mounted below the Grade Crossing Advance Warning (W10-1 through W10-4) sign on the approach to a grade crossing to provide supplemental information that the surface or condition of the grade crossing might require a reduced speed or some other appropriate action by the road user.
02. If the grade crossing is rough, word message signs such as BUMP, DIP, or ROUGH CROSSING may be installed. A W13-1P advisory speed plaque may be installed below the word message sign in advance of rough crossings.
§8B.26 Light Rail Transit Station Sign (I3-8)¶
Option
The Light Rail Transit Station (I3-8) sign (see Section 2H.01) may be used to direct road users to an LRT station or boarding location. It may be supplemented by the name of the transit system and by arrows as provided in Section 2D.08.
§8B.27 Emergency Notification System Sign (I13-1)¶
Standard
01. The Emergency Notification System (I13-1) sign (see Figure 8B-5) shall be installed on each approach at all highway-rail grade crossings, and at all highway-LRT grade crossings with automatic gates or flashing light-signals, to provide information to road users so that they can notify the railroad company or transit agency about emergencies or malfunctioning traffic control devices.
02. At a highway-rail grade crossing, the Emergency Notification System sign shall, at a minimum, include the USDOT grade crossing inventory number and the emergency contact telephone number.
03. Where Emergency Notification System signs are used at a highway-LRT grade crossing, they shall, at a minimum, include a unique crossing identifier and the emergency contact telephone number.
04. The minimum width of the Emergency Notification System sign shall be 12 inches and the minimum height shall be 9 inches. The lettering on Emergency Notification System signs for the telephone number, the grade crossing inventory number, and the explanation of the purpose of the sign shall be composed of numerals and upper-case letters that are at least 1 inch in height.
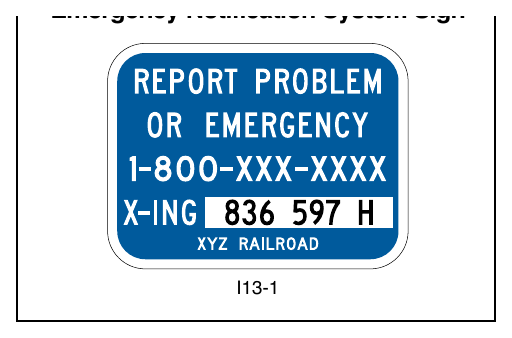
Signs shown: I13-1
05. Emergency Notification System signs shall be retroreflective.
06. Except as provided in Paragraph 7 of this Section, Emergency Notification System signs shall have a white legend and border on a blue background.
Option
07. The seven-character grade crossing inventory number may be shown on the sign as a black legend on a white rectangular background.
Guidance
08. Except as provided in Paragraph 12 of this Section, Emergency Notification System signs should be attached to the Crossbuck Assemblies or grade crossing signal masts on the right-hand side of each roadway approach to the grade crossing rather than on the railroad or LRT signal control equipment housings. Emergency Notification System signs should be oriented so the face of the sign is approximately parallel or approximately perpendicular to the edge of the roadway or pathway and is visible to road users or pathway users. The visibility of the Emergency Notification System sign should not be obstructed by automatic gates in either the vertical or horizontal position.
09. The Emergency Notification System signs should be positioned so as to not obstruct any traffic control devices or limit the view of rail traffic approaching the grade crossing.
10. Emergency Notification System signs mounted on Crossbuck Assemblies or signal masts should only be large enough to provide the necessary contact information. Use of larger signs on Crossbuck Assemblies or signal masts that might obstruct the view of rail traffic or other motor vehicles should be avoided.
11. At station crossings, Emergency Notification System signs or information should be posted in a conspicuous location.
Option
12. Emergency Notification System signs may be located on a separate post. Where located on a separate post, the size of the Emergency Notification System sign may be increased for improved visibility.
13. Where the improvement of the conspicuity of an Emergency Notification System sign is desired, a solid yellow rectangular header panel with a legend of “NOTICE” in black letters may be used (see Section 2A.11).
14. Additional Emergency Notification System signs may be installed at a grade crossing.